Author: Vianney Leduc Club: Ottawa bonsai Society
(Version française ci-dessous)
I acquired this Juniper Chinensis in the summer of 2007. It was field grown in South Korea. I acquired the tree because I loved the twisting veins on the trunk and to have a bigger challenge during my various courses. The challenge was bigger than I thought and I am still learning about the optimal horticultural techniques required!
The tree as acquired with minor bark cleanup.
Here is the other side of the trunk. That side was discarded as a potential front due to the reverse taper and because the twisting veins were less interesting than the other side.
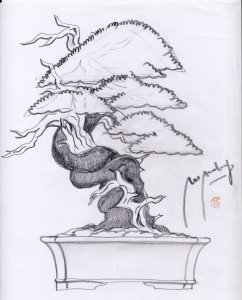
I brought the tree to my design course (September 2007) with Italian artist Michel Andolfo. His approach is to analyse the tree in details then explain the logic of his design choice and finally make a drawing of what the tree could look like. Here is the drawing he presented.
Since I was uncomfortable with all the heavy work required, I decided to take one step at a time. My first step in September 2007 was to cut all the non-required branches. I then repotted the tree the following spring and allowed it to grow freely for the next 2 years. You can see in the pictures below the tree after the initial removal of non-required branches and the growth after two years.
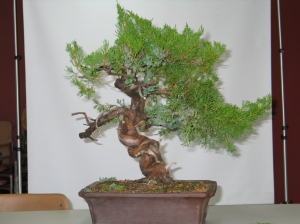
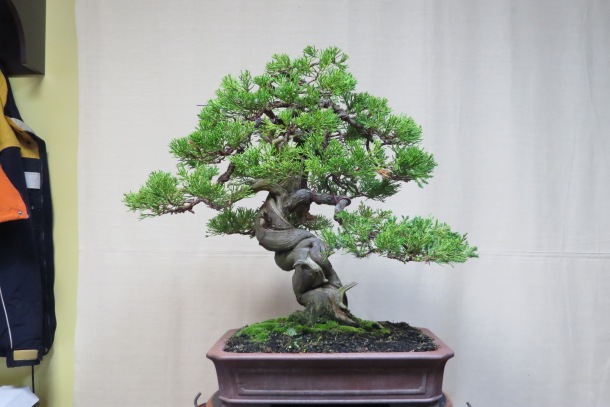
I did the first styling of the tree in the spring of 2010 (see result below) and then brought it back to Michel Andolfo for his comments. He indicated that the crown was too wide and flat for such a slim trunk and that I had cheated in many places with foliage placement in order to fill up empty areas.
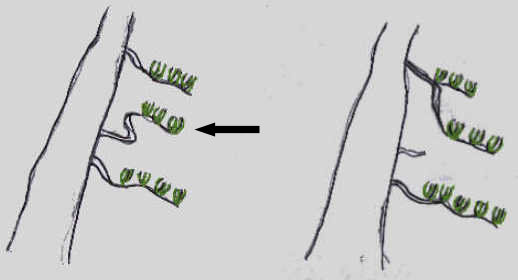
Below is a diagram showing the cheating technique I used. Almost all the primary branches were going downward to create the look of an old tree except for a few that I had brought upward to fill up empty spaces (left part of the diagram). The proper approach to build a good structure in such a case is to extend the foliage of an upper branch and bring it downward to fill up the empty space as show in the right portion of the diagram.
I decided to allow the branches to grow freely until I would have the desired foliage to build a proper structure. That took longer than expected…! I performed a second repot where I used Turface only as my soil. The tree grew very little in that soil and I repotted again 2 years later in a 50/50 mix of Chabasai and Turface. The tree started to grow properly again! I have later learned from Ryan Neil that although Turface can absorb a fair amount of water, it does not give much back to the tree.
I did the second styling in 2015 (see below) with the goal of building a proper branching structure. I have raised the top of the tree in order to build the crown higher. It felt like a step backward but it was the right foundation for the tree to evolve.
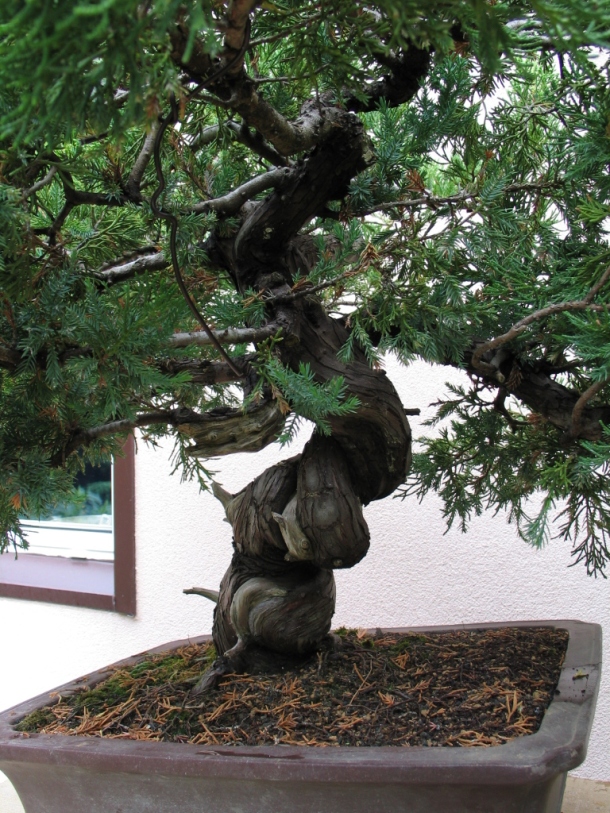
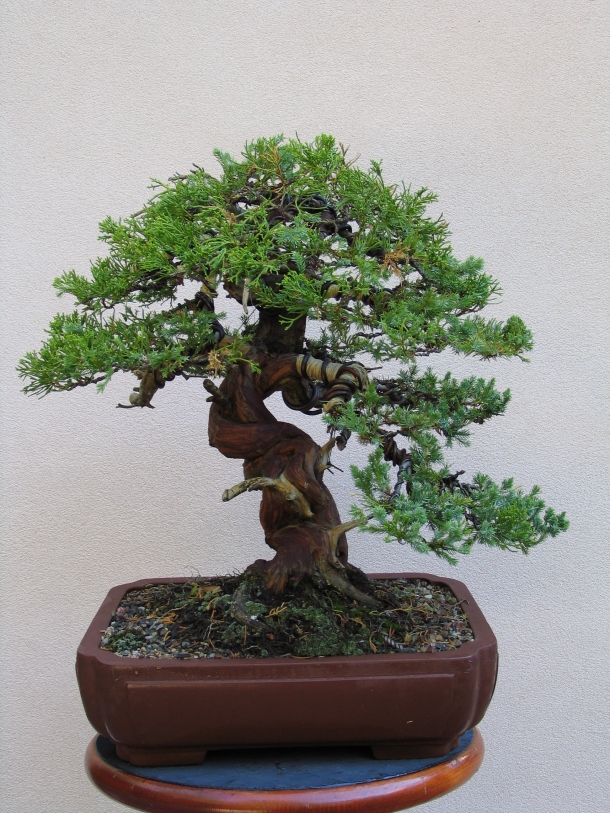
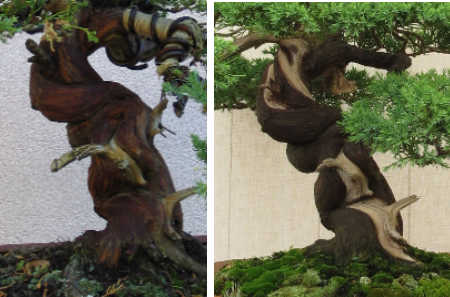
Back from my first Juniper course with Ryan Neil, I felt comfortable to reduce the size of the living veins in order to create deadwood on the trunk. Here is a comparison of the trunk before and after the reduction of the living veins.
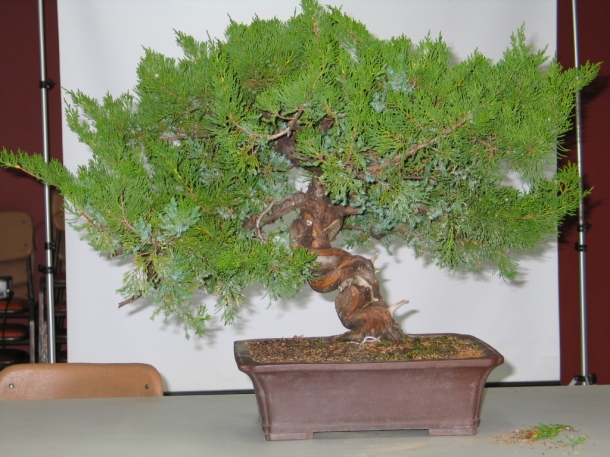
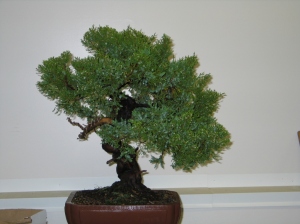
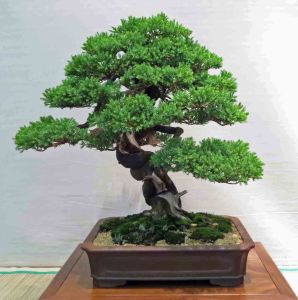
After 2 more years of growth the foliage pads were filing up nicely and the tree was shown in the September 2017 annual show of the Ottawa Bonsai Society.
NEXT STEP: The foliage pads are getting big in proportion to the trunk and I need to plan the next design evolution in order to maintain a proper balance. I also need to get a more appropriate pot for the tree. I feel that the current pot is too large and angular for the shape of the trunk.
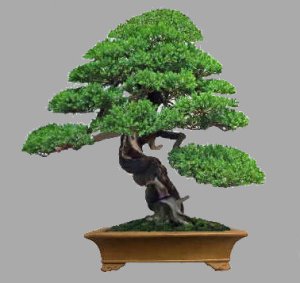
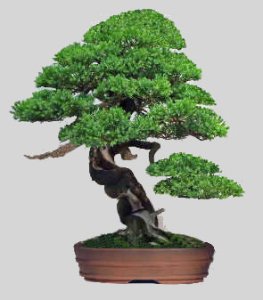
I made two photomontages of possible design evolution of the tree along with possible pots. My goal is for the trunk to gain more visual importance so I am choosing the option on the right. The left design is more calm and traditional but the silhouette is too wide for the trunk. The tree on the right design is more asymmetrical, is clearly pointing to the right and the silhouette is narrower which complements the trunk better. In other words, the design will evolve in the direction set in the drawing of Michel Andolfo!
A smaller pot will also increase the visual weight of the trunk. A darker earth tone colored pot will better complement the deadwood. The oval pot was designed by Quebec artist Claude Savard.
From an horticultural aspect: this tree can produce both juvenile and mature foliage as seen below. I had 90% of mature foliage in the spring of 2017 and 100% of juvenile foliage by the end of that summer…!
In experimenting to optimize the amount of water and fertilizer I went too far and provided the tree more then it required and it reacted by producing only juvenile foliage. I will readjust in the next two seasons and should get back to more mature foliage. On a Sargent juniper, which by nature does produce mainly mature foliage, the same watering and fertilizing regime does not have such an impact, it simply produce more growth.

=============================================================
Développement d’un genévrier.
J’ai acheté ce genévrier Chinensis à l’été 2007. Il a été cultivé en terre en Corée du Sud. J’ai acquis l’arbre parce que j’aimais les veines tordues sur le tronc et pour avoir un plus grand défi pour mes différents cours. Le défi était plus grand que j’avais imaginé et j’apprends encore sur les techniques horticoles optimales requises!
L’arbre tel qu’il a été acquis avec un nettoyage mineur de l’écorce.
Voici l’autre côté du tronc. Ce côté a été écarté comme la façade potentielle en raison de la conicité renversée et parce que les veines vivantes étaient moins intéressantes que l’autre côté.
J’ai apporté l’arbre à mon cours de design (septembre 2007) avec l’artiste italien Michel Andolfo. Son approche est d’analyser l’arbre en détails puis d’expliquer la logique de son choix de design et faire un dessin de ce à quoi l’arbre pourrait ressembler. Voici le dessin qu’il a présenté.
Comme je n’étais pas à l’aise avec tout le gros travail requis, j’ai décidé de procéder une étape à la fois. Ma première étape, en septembre 2007, a été de couper toutes les branches non requises. J’ai ensuite rempoté l’arbre le printemps suivant pour le laisser pousser librement pendant les 2 prochaines années. Vous pouvez voir dans les images ci-dessous l’arbre après l’élimination initiale des branches non requises et la croissance après deux ans.
J‘ai fait la première mise-en-forme de l’arbre au printemps 2010 (voir le résultat ci-dessous) puis je l’ai apporté à Michel Andolfo pour ses commentaires. Il a indiqué que la couronne était trop large et écrasée pour un tronc si mince et que j’avais triché à différents endroits avec le placement du feuillage pour remplir des zones vides.
Voici un diagramme montrant la mauvaise technique que j’ai utilisée. Presque toutes mes branches primaires descendaient vers le bas pour créer l’apparence d’un vieil arbre à l’exception de quelques-unes que j’avais pliées vers le haut pour remplir les espaces vides (partie gauche du diagramme). L’approche appropriée pour construire une bonne structure dans un tel cas consiste à faire allonger le feuillage d’une branche supérieure et de le plier vers le bas pour remplir l’espace vide comme le montre la partie droite du diagramme.
J’ai donc décidé de permettre aux branches de pousser librement jusqu’à ce que j’aie le feuillage désiré pour construire une bonne structure. Cela a pris plus de temps que prévu…! J’ai effectué un deuxième rempotage où j’ai utilisé du Turface seulement comme substrat. L’arbre a très peu poussé dans ce substrat et j’ai dû rempoter l’arbre deux ans plus tard dans un mélange 50/50 de Chabasai et de Turface. L’arbre a recommencé à pousser correctement! J’ai appris plus tard avec Ryan Neil que même si le Turface absorbe une bonne quantité d’eau, il ne la redonne pas assez à l’arbre.
J’ai fait la deuxième mise-en-forme en 2015 (voir ci-dessous) dans le but de construire une bonne structure de branches. J’ai soulevé la couronne de l’arbre afin qu’elle soit moins large et moins écrasée. C’était comme un recul, mais l’arbre a maintenant une bonne structure pour son évolution.
De retour de mon premier cours de genévrier avec Ryan Neil, je me suis senti à l’aise de réduire la taille des veines vivantes afin de créer du bois mort sur le tronc. Voici une comparaison du tronc avant et après la réduction des veines vivantes.
Après deux années de croissance, les couches de feuillages s’amélioraient et l’arbre a été présenté lors de l’exposition annuelle de septembre 2007 de la Société de Bonsaïs d’Ottawa.
Prochaine étape: Les couches de feuillage commencent maintenant à être grosses en proportion du tronc et je dois planifier la prochaine évolution afin de maintenir un bon équilibre. J’ai aussi besoin d’un pot plus approprié pour l’arbre. Le pot actuel est trop large et angulaire pour la forme du tronc.
J’ai fait deux photomontages d’évolution possible de l’arbre avec des pots différents. Mon objectif est que le tronc gagne en importance visuelle, donc je choisis l’option de droite. Le design de gauche est plus calme et traditionnel mais la silhouette est trop large pour le tronc. L’arbre sur le dessin de droite est plus asymétrique, pointe nettement vers la droite et la silhouette est plus étroite ce qui complémente mieux le tronc. En d’autres termes, le design évoluera dans le sens du dessin de Michel Andolfo!
Un pot plus petit augmentera également le poids visuel du tronc. Un pot de couleur brun foncé complémenterait mieux le bois mort. Le pot ovale a été conçu par l’artiste Québécois Claude Savard.
Du point de vue horticulture: ce genévrier produit des pousses juvéniles et matures tel que l’on peut voir dans la photo ci-dessous. J’avais 90% de feuillage mature au printemps 2017 et 100% de feuillage juvénile par le la fin de l’été…!
En expérimentant pour optimiser la quantité d’eau et d’engrais requis par cet arbre, je suis allé trop loin et il a réagi en ne produisant que du feuillage juvénile. Je vais ajuster la fréquence d’arrosage et la quantité d’engrais dans les deux prochaines saisons et le feuillage devrait revenir majoritairement mature. Sur un genévrier Sargent, qui produit par nature un feuillage principalement mature, le même régime d’arrosage et de fertilisation a simplement produit une plus grande quantité de feuillage mature.

Beautiful.
LikeLike
Thanks! I will document the next design evolution.
LikeLike