Author: Aaron
Clubs: Bonsai Society at the Royal Botanical Gardens and Toronto Bonsai Society
(Version française ci-dessous)
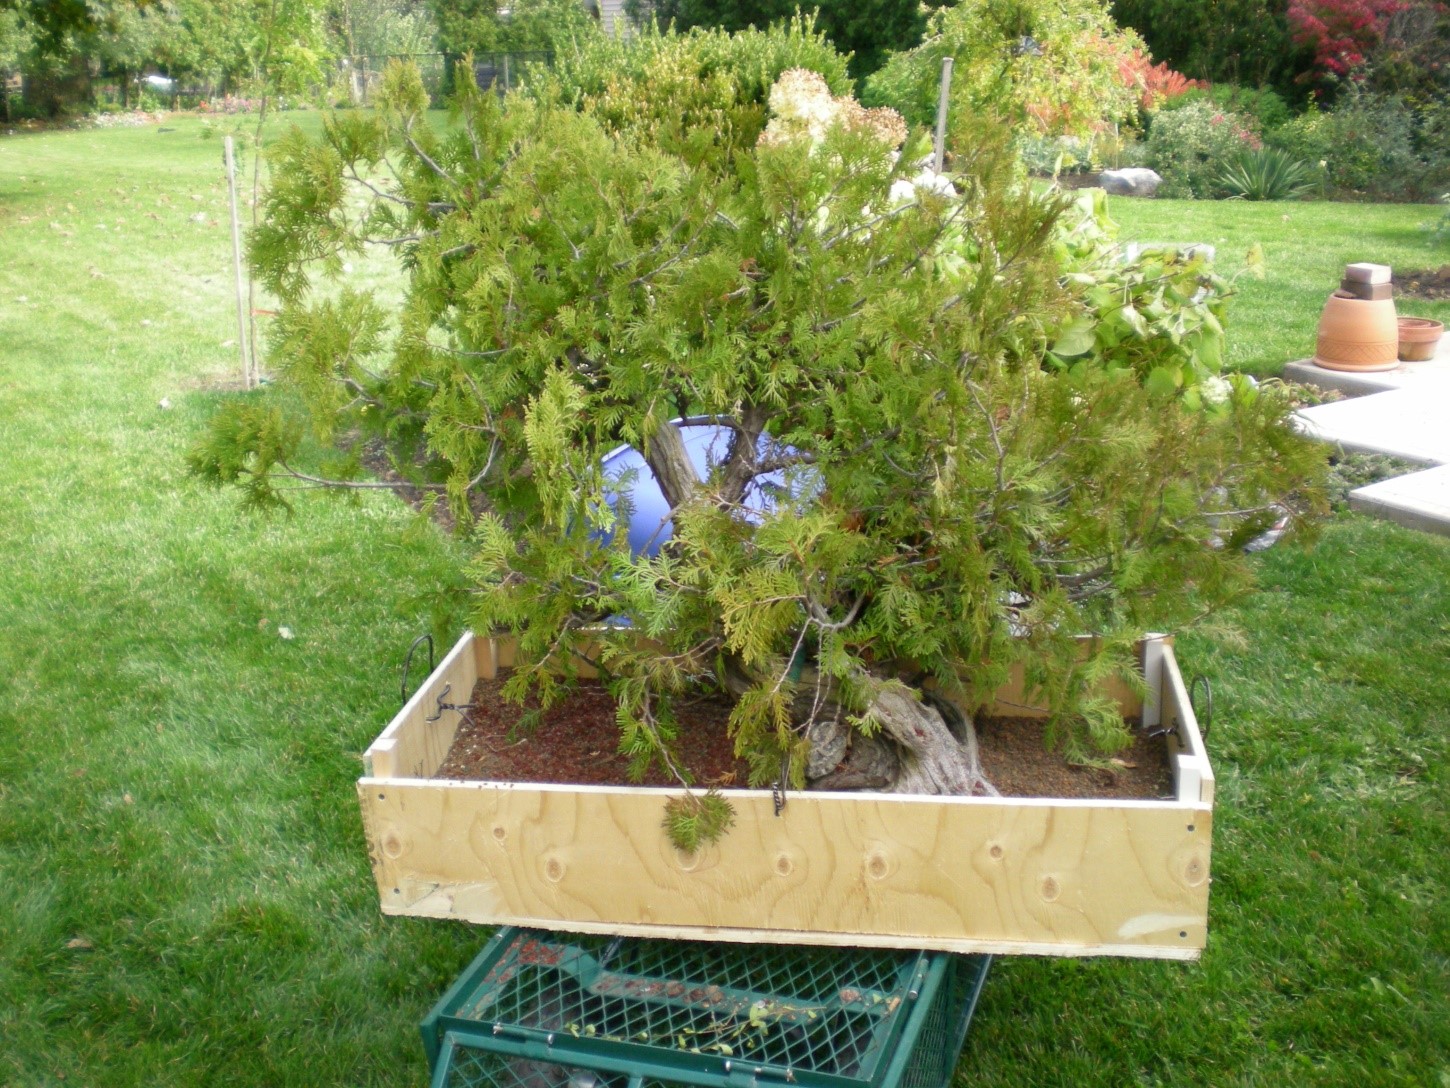
This eastern white cedar was collected on October 16, 2010 along a rugged lakeshore approximately 20 meters from the water, where very few trees live to great age due to the ice flows. After about an hour of work I was still unable to extract it from the rock and was ready to give up when my more experienced collecting partner said something along the lines of “let me try” and promptly ripped it free (I think I was coddling it a bit too much). Upon getting the tree home, I potted it up in an excessively large plywood coffin, worked lava rock in and around the root ball, and put it right into winter storage.
Below, the tree in the fall of 2010, after collection.
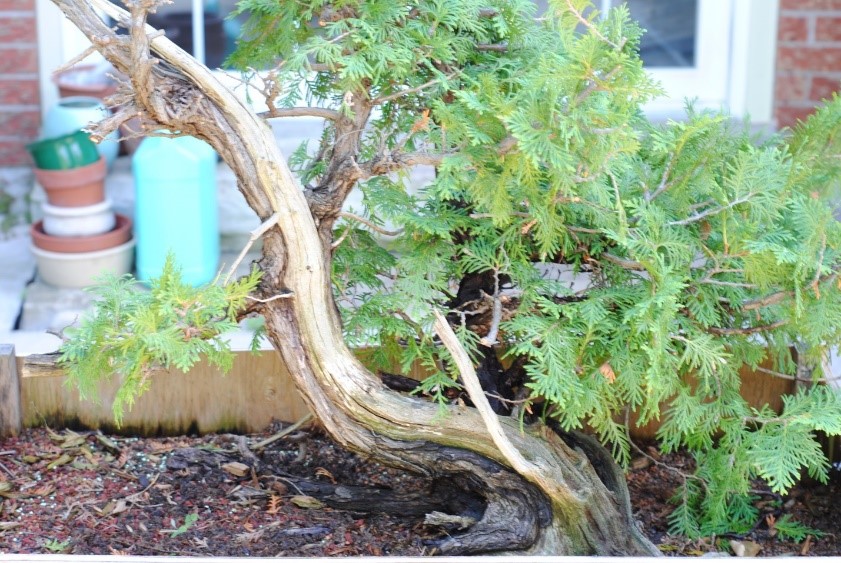
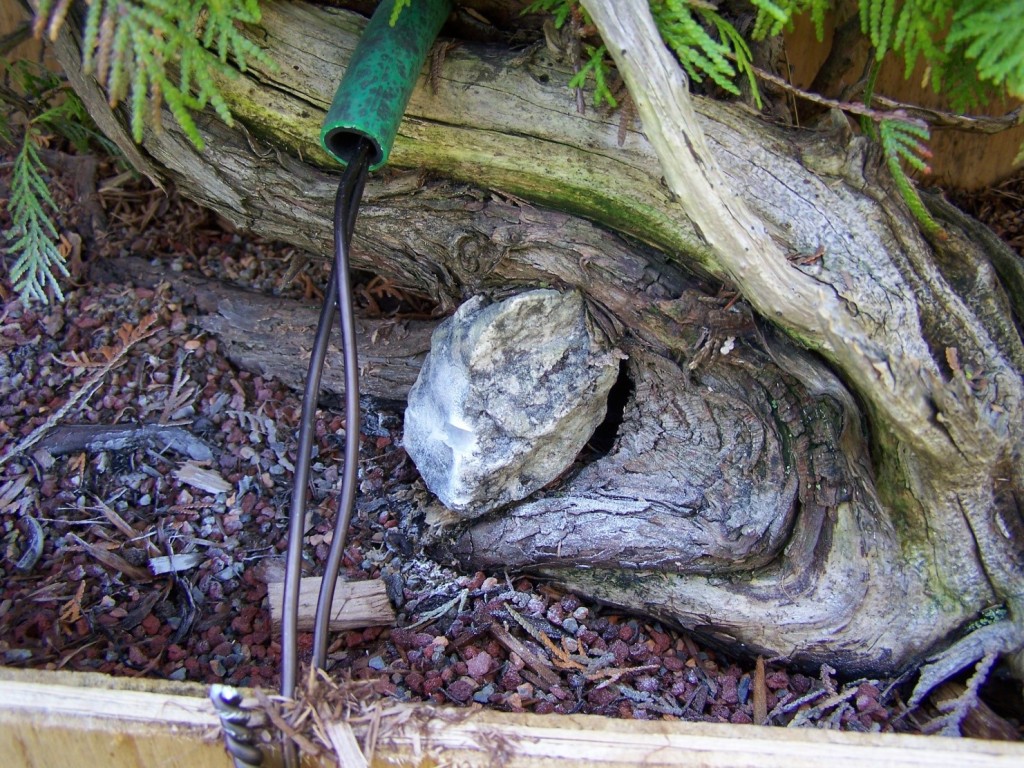
In May 2011 the tree was looking extremely healthy so I carefully removed a rock that the tree had grown around over the years by cutting the rock in half with a die grinder (the tree was not disturbed during this operation).
Here is the rock before and after the cut


This was the first significant tree I collected, and it spoiled me – I don’t know if any tree I’ve collected since has responded so well to transplanting. By the summer of 2011, I felt brave enough to do some major pruning (the vast majority of cedars I collect don’t get touched until the second year).
Here is the tree in June 2011, looking a bit yellow but showing good signs of recovery.

… and in July 2011 following the removal of a major section of foliage.
In October 2011 I took the tree to a workshop with David Easterbrook. While no work was done, we discussed future design possibilities. He believed that the primary branch on the left should be removed, although I was concerned about the effect this might have on the live vein. We agreed to disagree on that one.
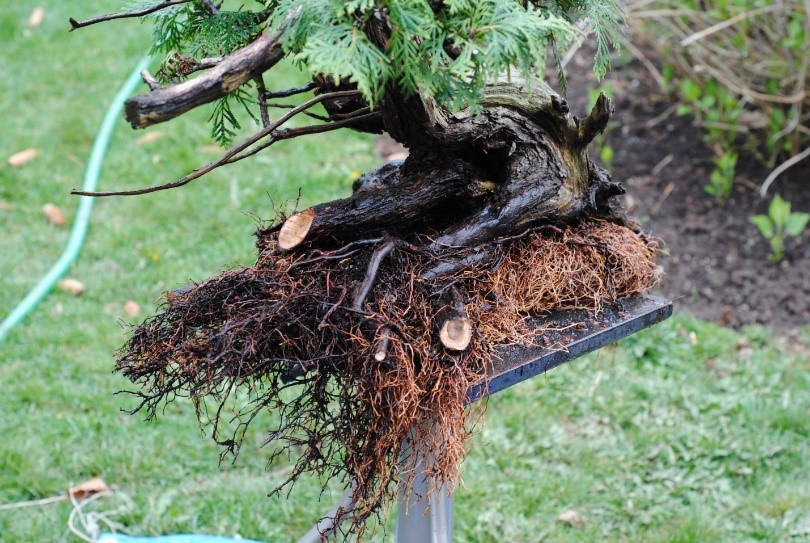
In April 2012 the tree was removed from its plywood coffin and planted into a more manageable cedar grow box in 100% lava rock. Some major roots were reduced and the tree was bare rooted with the hose. This may be a controversial practice for some, but it is something I do in the first repotting of every cedar and larch I collect. In bonsai cultivation, roots do not grow well (if at all) in the ancient black muck that accumulates in the core of the root ball. Getting rid of this muck as soon as possible will improve the health of the tree and greatly simplify watering. For the remainder of 2012, the tree was allowed to grow freely, perhaps with a light thinning or two.
Below are the roots in the spring of 2012 during the process of bare rooting. Note how weak the roots are in the core (where they were growing in the black field muck) compared to the perimeter (where they were growing into the lava rock).
After the Spring 2012 repot.

In May 2013 I gave the tree its first structural wiring under the guidance of Marco Invernizzi, who was sympathetic towards my ownership of such a large eastern white cedar. For the rest of the year, the tree was treated to a couple of thinning sessions, and then quickly grew out of shape. During this time the focus was trimming to create ramification.
Below: the tree in August 2013, displaying the typically overwhelming eastern white cedar foliage. The guy wire anchored to the front of the grow box was used to pull down the branch in the upper trunk region over a period of a few years.

In July 2014 the tree was styled in some detail and the new planting angle was considered. I knew since collecting it that the tree would have to be tilted strongly to the right because a major section of the trunk was parallel to the ground. I also knew this would be problematic because of the widely fluted base (normally extremely desirable in a bonsai, but here it presented some problems with the design).
Below: July 2014 after a rough styling.

… and August 2014 after a round of scissor thinning and a new angle.

In May 2015 the tree was transplanted at a more correct angle into its current container – a cheap and extremely heavy Chinese pot. Up until this point it was growing in pure lava rock, but since my goal was refinement from here on, I mixed approximately 1/3 soft akadama with the lava rock to add some water retention and density to the soil. By the summer, it was overgrown and in need of re-working so all wire was removed, it was thinned, the deadwood was cleaned, and then it was completely detail wired.
Below: July 2015 before thinning and cleaning.

… July 2015 after thinning and cleaning.

… and July 2015 after detail wiring.
From that point on it was a matter of developing the foliage pads mostly with scissor cutting and with a bit of pinching. I like the look of thuja pads made up of flat fronds, but these are contrary to its natural growth habit and extremely labour intensive to maintain.
Below: June 2016

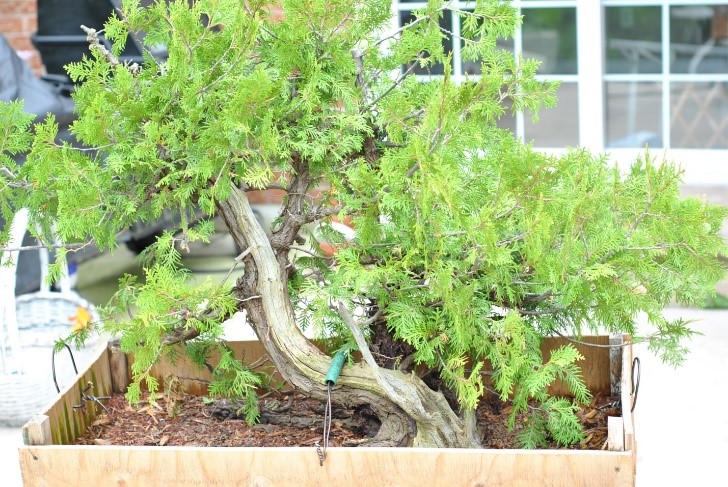
… and May 2017 at the Toronto Bonsai Society spring show.

In spring 2019 the tree was transplanted into a shallow, grey Japanese pot of much higher quality, and responded well. Unfortunately, I don’t have any worthy pictures of the tree in its current pot at this time. Additionally, following an unfortunate development in the tree in 2020, a major redesign is now inevitable in its future. It was supposed to be submitted for exhibition in the next US National Bonsai Exhibition in Rochester, but that goal has been pushed even farther down the line than the COVID-19 pandemic could manage.
=================================
Developement d’un cèdre blanc
Ce cèdre blanc a été cueilli le 16 octobre 2010 sur un rocher le long d’un lac à environ 20 mètres de l’eau, où très peu d’arbres vivent longtemps en raison des glaces sur le bord. Après environ une heure de travail, j’étais encore incapable de l’extraire de la roche et j’étais prêt à abandonner quand mon collègue, plus expérimenté, a essayer et a pu rapidement le sortir de la roche (Je crois que j’étais trop doux dans mon approche…!). À mon retour à la maison, je l’ai rempoté dans une très grande boîte de bois en utilisant seulement de la roche volcanique insérer délicatement sans trop dérangé les racines. Je l’ai ensuite placé directement dans son endroit pour l’hiver.
Ci-dessous, Automne 2010, après la cueillette.

En mai 2011, l’arbre avait l’air en excellente santé et j’ai décidé d’enlever soigneusement une roche autour de laquelle l’arbre avait poussé au fil des ans. J’ai coupé cette roche en deux avec un outils et l’arbre n’a pas été affecté pendant cette opération.
Voici la roche avant la coupe et après la coupe.

C’était le premier arbre d’importance que j’ai cueilli, et cela m’a gâté car je ne crois pas que les arbres que j’ai cueillis depuis ont aussi bien répondu au rempotage. À l’été 2011, je me suis senti assez courageux pour faire une taille importante (la grande majorité des cèdres que je cueille ne sont pas travaillé avant la deuxième année).
Ci-dessous, l’arbre en Juin 2011, un peu jaune mais montrant de bons signes de reprise.
… et en Juillet 2011 après une taille importante du feuillage.

En octobre 2011, j’ai apporté l’arbre à un atelier avec David Easterbrook. Bien qu’aucun travail n’ait été fait, nous avons discuté des possibilités de design. David suggérait que la branche principale de gauche devait être enlevée même si j’étais préoccupé par l’effet que cela pourrait avoir sur la veine vivante. Nous avons convenu de ne pas être d’accord sur ce point.
En avril 2012, l’arbre a été rempoté dans une boîte de bois plus petite et plus facile à gérer en utilisant 100% de roche volcanique comme substrat. Quelques grosses racines principales ont été réduites et les autres racines ont été mise-à-nues avec un boyau d’eau. Bien que cela peut être une pratique controversée pour certains, c’est quelque chose que je fais dans le premier rempotage de chaque cèdre et mélèze que je cueille. Dans la culture du bonsaï, les racines ne poussent pas bien (voire pas du tout) dans l’ancienne boue qui s’accumule au cœur de la motte. On améliore la santé de l’arbre et on simplifie grandement l’arrosage en se débarrassant de cette boue le plus tôt possible. Pour le reste de 2012, l’arbre à pousser librement, à l’exception d’un ou deux éclaircissements légers.
Ci-dessous; les racines au printemps 2012 durant le processus de nettoyage des racines à nue. Notez à quel point les racines sont faibles dans le cœur de la motte (où elles poussaient dans la boue) par rapport au périmètre (où elles poussaient dans la roche volcanique).

Printemps 2012 après rempotage.

J’ai fait un ligaturage structurel en mai 2013 sous la direction de Marco Invernizzi, qui était sympathique envers mon attachement à ce gros cèdre blanc. Pendant le reste de l’été, l’arbre a subi quelques tailles d’éclaircissage, puis s’est rapidement déformé. Pendant cette période, je mettais l’accent sur la taille pour créer de la ramification.
Ci-dessous : Août 2013, l’arbre avec son énorme quantité de feuillage typique à l’espèce. Un hauban pour abaisser une branche dans la région supérieure du tronc a été ancré à l’avant de la boîte et a été laisser en place sur une période de quelques années.
En juillet 2014, l’arbre a été mise-en-forme et un nouvel angle d’inclinaison du tronc a été considéré. Je savais depuis sa cueillette que l’arbre devrait être incliné vers la droite car une partie importante du tronc était parallèle au sol. Je savais aussi que ce serait problématique en raison de la base du tronc qui est très large (normalement extrêmement souhaitable dans un bonsaï, mais ici, cela présentait des défis de design).
Ci-dessous : Juillet 2014 après une mise-en-forme de base.
… et en Août 2014 après une série d’éclaircissage aux ciseaux et une nouvelle inclinaison.
En mai 2015, l’arbre a été rempoté dans l’inclinaison approprié dans le pot actuel; un pot chinois bon marché et extrêmement lourd. Jusque-là, je le cultivais dans de la roche volcanique pure, mais comme mon objectif était maintenant le raffinement, j’ai mélangé environ 1/3 d’akadama mou avec de la roche volcanique pour ajouter un peu de rétention d’eau et de densité au sol. L’arbre a développé une très grande quantité de feuillage durant l’été et avait besoin d’être retravaillé; donc tout le fil a été enlevé, l’arbre a été taillé, le bois mort a été nettoyé et l’arbre a été complètement ligaturé.
Ci-dessous : Juillet 2015 avant la taille et le nettoyage.
… Juillet 2015 après la taille et nettoyage.
… et Juillet 2015 après le ligaturage détaillé.
Ma prochaine étape consistait à développer les couches de feuillage principalement avec des tailles aux ciseaux et du pincement. J’aime l’aspect des couches de feuillage de thuya composés de sections de feuillage plates, mais celles-ci sont contraires à son mode de croissance naturelle et demandent énormément d’entretien.
Ci-dessous : l’arbre en Juin 2016.
Ci-dessous : photo en Mai 2017 à l’exposition du printemps de la Société de bonsaï de Toronto.
Au printemps 2019, l’arbre a été rempoté dans un pot japonais gris, peu profond et de meilleure qualité. L’arbre a très bien répondu à ce rempotage. Malheureusement, je n’ai pas de photos dans son nouveau pot. Suite à un développement malheureux en 2020 pour cet arbre, un changement de design majeur sera requis dans un avenir rapproché. Il était censé être présenté à la prochaine exposition nationale américaine du bonsaï à Rochester (i.e. US National Bonsai Exibition), mais cet objectif a été poussé encore plus loin même en considérant le changement imposé par la pandémie de la COVID-19.

The tree is looking wonderful! Two questions about your experience with this species in your climate: What kind of soil did you use for the initial potting after cultivation? and what is done with it in the winter?
LikeLike
Hello Christian, i live in the country where my well water limits me in term of bonsai soil for my Thuya (i.e. Eastern white cedar). I used Turface MVP as my only soil component for all my Thuya. My colleague who lives in the city use an equal mix of Chabasai, Pumice and volcanic rock and is getting excellent result. If the tree is collected in late summer, i would protect it for the winter by placing it in a cold room where the temperature never goes below freezing. If the tree is collected in the spring, i would decide on winter location based on the amount of new foliage the tree has developed during the summer.
LikeLike